What is a rifle scope windage turret? It's the adjustment knob on the side of your scope that lets you shift your reticle left or right to compensate for wind drift. Think of it as the horizontal counterpart to the elevation turret, which handles vertical corrections.
Most modern scopes use either MOA or MRAD click systems to measure turret movement. As of 2026, virtually every major optics manufacturer offers scopes with windage turrets built for precise, repeatable field adjustments. Here's how the turret works and where shooters go wrong.
Quick Answer
A rifle scope windage turret moves your reticle horizontally for wind correction. It sits on the left or right side of the scope body. Turning it shifts your crosshair in measured clicks.
Most turrets use MOA or MRAD click values. This lets you dial in wind drift without changing your rifle's zero.
What Is a Rifle Scope Windage Turret?
The windage turret is a mechanical knob built into a rifle scope. Its job is to move your reticle left or right so you can compensate for wind pushing your bullet off course.
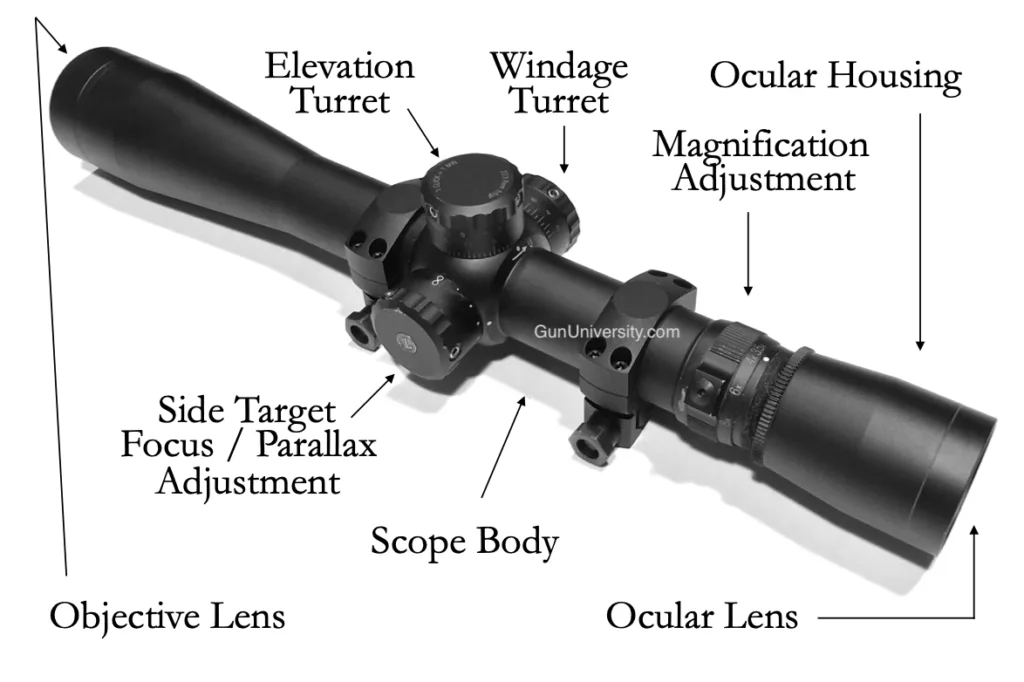
On most scopes, the windage turret sits on the left side of the scope body. The elevation turret sits on top. Both control the reticle's position, but they work on different axes.
Windage handles horizontal movement. Elevation handles vertical movement.
Here's the key detail. The turret doesn't move your bullet's flight path. It moves where your crosshair sits relative to the barrel.
You're re-indexing your point of aim, not changing how the rifle itself shoots.
Each click moves the reticle by a set amount. Most MOA (Minute of Angle) scopes use 0.25 MOA per click. Most MRAD (milliradian) scopes use 0.1 MRAD per click.
These click values are what make the turret precise and repeatable.
- 0.25 MOA per click: moves the reticle about 1/4 inch at 100 yards
- 0.1 MRAD per click: moves the reticle about 1 cm at 100 meters
Per manufacturer specifications from Nightforce Optics, most modern scopes offer roughly ±60 MOA or ±18 MRAD of total windage travel. That's enough room to dial corrections even in severe wind.
So if your bullet drifts 2 inches right at 300 yards, and you're using 0.25 MOA clicks, you'd dial about 2 to 3 clicks left. Simple math. Repeatable results.
That's the whole idea behind the turret.
How the Windage Turret Actually Works
To understand the windage turret, picture what happens inside the scope when you turn it.
The scope contains two adjustment assemblies. One sits on top for elevation. One sits on the side for windage.
Each has a small cam or screw mechanism that shifts an internal tube. That tube holds your reticle.
When you rotate the windage turret, the internal screw moves laterally. This pushes the reticle tube left or right inside the scope. Through the eyepiece, you see the crosshair shift against your target.
The turret is marked with tick marks and numbers. Each tick represents one click. The number shows how far you've dialed from your starting point.
Look through the scope while turning the turret. The reticle moves in clean, stepped increments. Not smooth.
Each click is a distinct step. That stepped movement is what makes the turret so precise.
Here's what one click translates to at different ranges:
| Click Value | 100 Yards | 200 Yards | 300 Yards |
|---|---|---|---|
| 0.25 MOA | ~0.25 in | ~0.50 in | ~0.75 in |
| 0.1 MRAD | ~0.36 in | ~0.72 in | ~1.08 in |
The turret also has a return-to-zero reference point. This is where you've established your rifle's original zero. Most shooters keep the turret here when conditions are calm.
They dial out from there when the wind picks up.
Some scopes, like models from Vortex Optics, include a zero stop mechanism. This physical stop prevents you from dialing past your zero point. It's simple, but hugely useful in the field.
Where the Turret Sits and What to Look For on Your Scope
The windage turret is located on the left side of the scope body on most designs. Some brands place it on the right, but left-side placement dominates as of 2026.

What you'll notice first is the turret's design style. There are two main categories.
Exposed (tactical-style) turrets have tall, unsheathed knobs with clear markings. They're built for shooters who need to adjust quickly in the field. Most precision rifle competition shooters run exposed turrets on both elevation and windage positions.
Capped turrets have protective covers that screw on over the knob. Once you set them, you replace the cap to prevent accidental adjustment. This style is common on hunting scopes where you zero at the bench.
Beyond style, here's what to look for when evaluating a scope's windage turret:
- Turret markings: Clear, legible numbers and tick marks. Some scopes mark every click. Others number every 1 or 2 clicks.
- Indicator pointer: A fixed notch that shows the turret's current position relative to zero.
- Zero stop: A mechanical stop that lets you dial back to zero without counting clicks. Huge time-saver.
- Tube diameter: Scopes with 30mm or 34mm tubes generally offer more turret travel than 1-inch tubes.
- Knurling texture: The grip pattern on the turret knob. Aggressive knurling helps with gloved hands or cold conditions.
Manufacturer spec sheets from brands like Nightforce and Schmidt & Bender list turret travel, click values, and whether a zero stop is included. Check these specs before you buy.
Common Windage Turret Mistakes Shooters Make
Even experienced shooters make windage turret errors. Here are the most common ones and how to avoid them.
Mistake 1: Misreading the click value.
Most MOA scopes use 0.25 MOA clicks. Most MRAD scopes use 0.1 MRAD clicks. But not all.
Some older or budget scopes use 1 MOA per click or 2 MRAD per turn. Assume the wrong click value and every adjustment you make is off.
Mistake 2: Scope cant.
If your scope is mounted even slightly crooked, turning the windage turret also shifts your point of impact vertically. A 2-degree cant can mix your windage and elevation corrections together. Use a bubble level to verify scope alignment before dialing.
Mistake 3: Forgetting to return to zero.
After dialing a wind correction, many shooters forget to reset. The next shot goes in the wrong direction because the turret is still set for the previous condition. Always return to zero after each wind change.
Mistake 4: Over-correcting.
If you estimate 2 inches of drift but actual drift is 1 inch, you've now over-corrected by 1 inch. Small, measured adjustments beat big, guessed ones.
Mistake 5: Mixing up MOA and MRAD systems.
You can't dial in MOA on an MRAD scope. The turret moves in MRAD increments. Misreading the system throws off every adjustment you make.
Mistake 6: Ignoring turret tracking errors.
Some lower-end scopes don't track perfectly. Dialing 10 clicks might only actually move the reticle 8 clicks. Competitive shooting communities report that repeatability testing at multiple ranges catches these issues early.
When to Dial the Turret vs Hold With the Reticle
There are two ways to correct for wind with a rifle scope. You can dial the windage turret to shift your point of aim. Or you can hold over with the reticle and let the wind push the bullet into place.
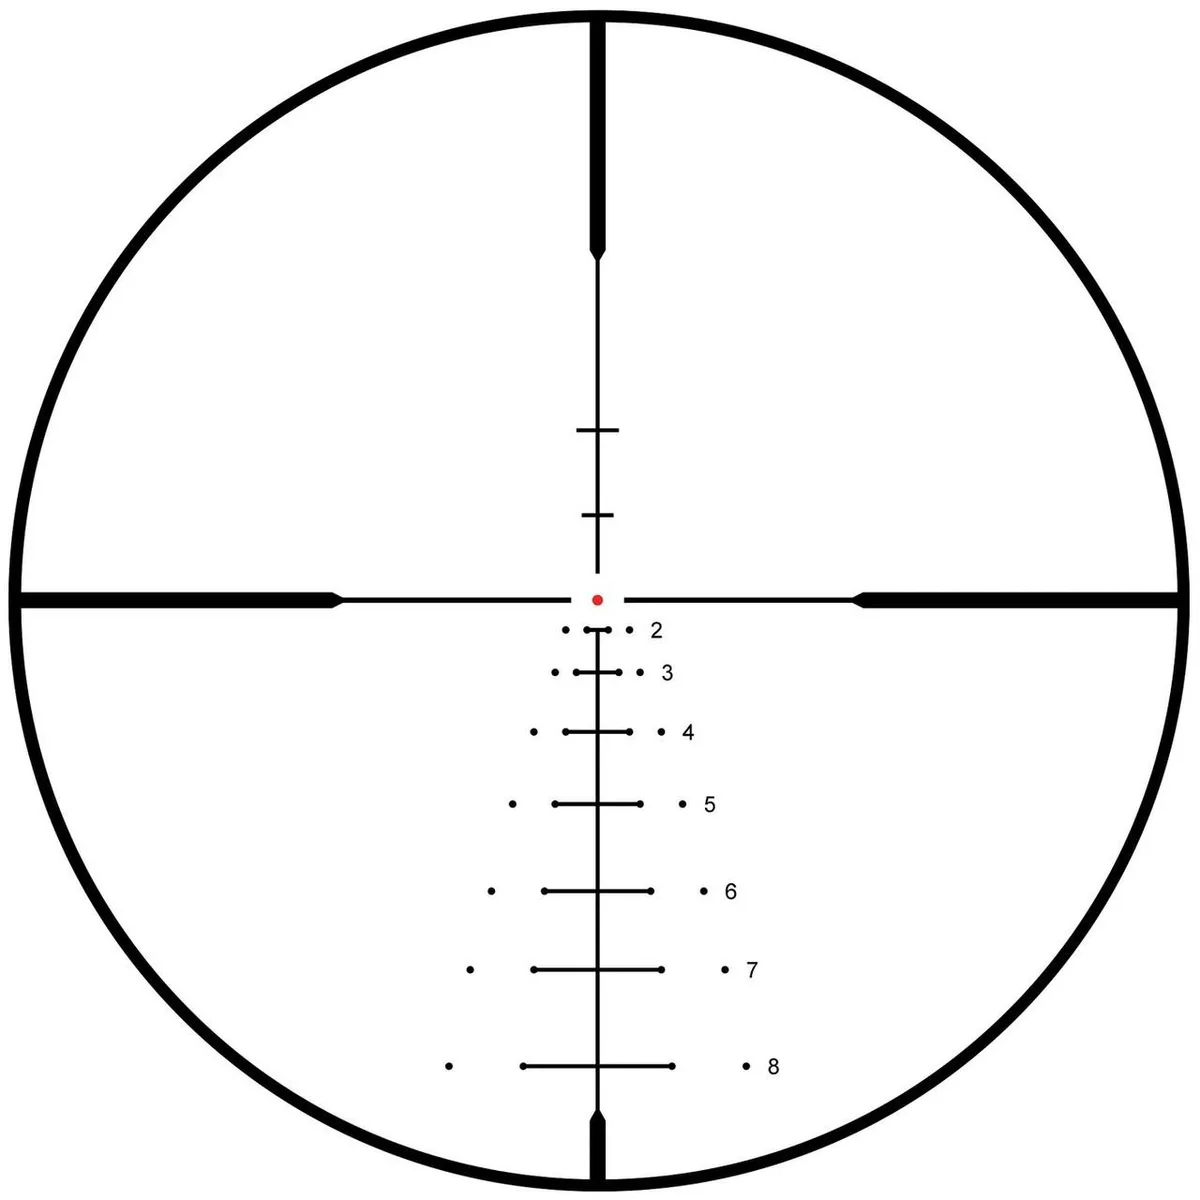
Neither method is universally better. The right choice depends on the situation.
Dial the turret when:
- Wind is strong and sustained (10+ mph)
- You're shooting at long range (300+ yards)
- You have time to read the wind and make a calculated adjustment
- Your scope has a zero stop for quick dial-back
- You're in a competition environment where every shot counts
Hold with the reticle when:
- Wind is variable and gusting
- Targets are close range (under 200 yards)
- You need to shoot quickly without pausing to dial
- You're hunting and the animal might move
- Conditions change faster than you can dial
Here's the data behind the choice. At 300 yards, a 10 mph crosswind can push a 150-grain .308 bullet about 12 to 14 inches off course. Dialing that precisely usually beats holding.
At 100 yards, that same drift shrinks to about 4 inches. Most shooters can hold for that using reticle hash marks.
Competition shooters often use a hybrid approach. They dial for the dominant wind condition and hold for small variations. This gives precision without constantly resetting the turret.
The visual cue that helps most: learn what your reticle's hash marks mean at various distances. If your scope's reticle subtensions are calibrated at 100 yards, each mark represents a specific amount of drift at that range. Learn those values and holding becomes instinctive.