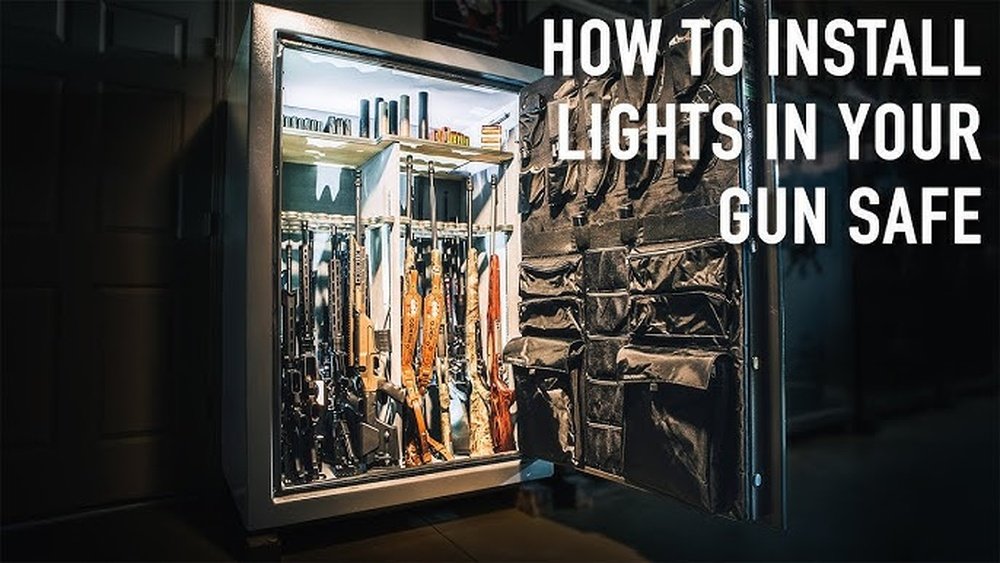
Are you tired of fumbling around in the dark every time you open your gun safe? Installing LED lights inside your safe can change that instantly.
Imagine finding your firearms quickly and safely, even in low light. But how do you do it without damaging your safe or creating a mess? This guide will walk you through simple, step-by-step instructions to light up your gun safe the right way.
Keep reading, and you’ll have a bright, organized space ready in no time.

Choosing The Right Led Lights
Choosing the right LED lights for your gun safe is important. The right lights help you see clearly inside the safe. They also save energy and last longer. Picking the best type depends on your needs and safe size. Consider brightness, color, and power source for the best fit.
Types Of Led Lights For Gun Safes
Several LED light types work well inside gun safes. Strip lights stick to the walls or ceiling. They spread light evenly. Puck lights are small and round. They give focused light to one spot. Motion sensor lights turn on when you open the safe. These save power and add convenience.
Brightness And Color Temperature
Brightness is measured in lumens. Choose a light with 100 to 300 lumens for clear visibility. Color temperature shows how warm or cool the light looks. Warm lights have a yellow tone. Cool lights have a white or blue tone. Neutral white light is best for safe interiors. It helps see colors clearly and reduces eye strain.
Battery Vs. Wired Options
Battery-powered LED lights are easy to install. They need no wiring and work during power outages. Replace batteries regularly to keep lights bright. Wired LED lights need electrical setup. They offer constant power and no battery changes. Pick wired lights if you want a permanent solution. Battery lights suit quick or temporary setups.

Gathering Necessary Tools
Before installing LED lights in your gun safe, gather all necessary tools. Having the right tools ready makes the job easier and safer. It also helps avoid delays during installation. Take time to collect everything you need to work smoothly.
Basic Tools Required
Start with basic tools for most LED light installations. A drill is essential for making holes to mount lights. Screwdrivers, both flathead and Phillips, help tighten screws securely. Wire cutters and strippers prepare wires for connection. A measuring tape ensures correct placement of lights. A pencil or marker helps mark spots on the safe. These tools cover the main steps of installing LED lights.
Additional Supplies To Have
Some extra items improve the installation process. Electrical tape keeps wire connections safe and neat. Zip ties help organize wires inside the safe. Double-sided tape or mounting pads can hold lights without drilling. A voltage tester checks if power is flowing correctly. Batteries are needed if using battery-powered LED strips. Having these supplies ready prevents interruptions and keeps the project tidy.
Preparing The Gun Safe
Preparing your gun safe is an important first step before installing LED lights. Proper preparation helps ensure the lights fit well and work correctly. It also keeps the safe clean and avoids damage.
Cleaning The Interior Surface
Start by removing all items from the gun safe. Use a soft cloth to wipe down the interior walls. Clean away dust, dirt, and any grease spots. A clean surface helps the LED strips stick better. Avoid using harsh chemicals that can damage the safe’s finish. Let the interior dry completely before moving to the next step.
Selecting Mounting Locations
Choose spots inside the safe where the lights will shine best. Think about areas that need the most light. Common places include the top and sides of the safe. Avoid blocking gun racks or shelves. Make sure the spots are flat and smooth for easy attachment. Also, check that wires can reach the power source without stretching.
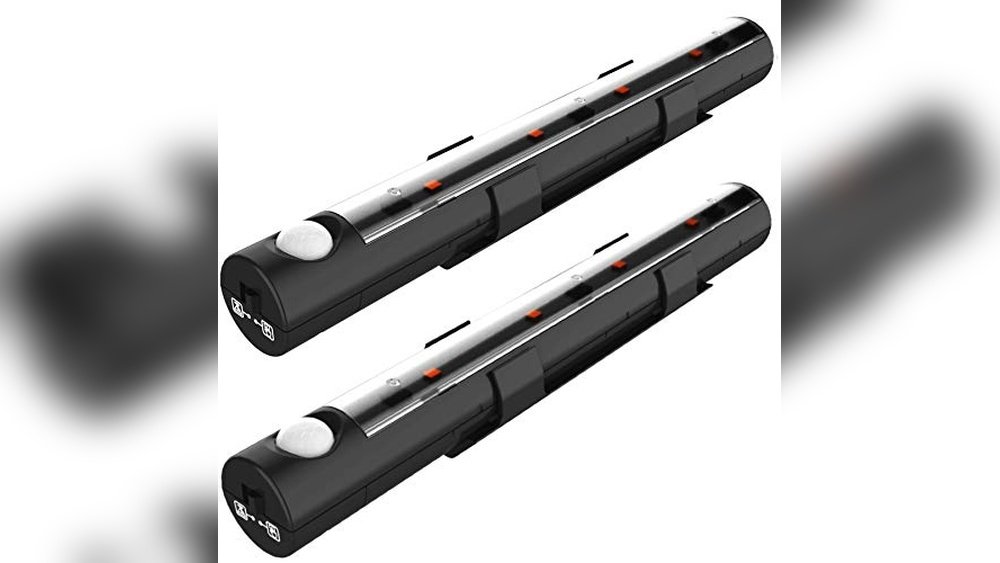
Installing Battery-powered Led Lights
Installing battery-powered LED lights in your gun safe makes it easier to see inside. These lights do not need wiring and work independently. They provide bright, clear light and save energy. Follow simple steps to install them correctly for best results.
Mounting The Lights
Choose a spot inside the safe where the light shines on all shelves. Clean the surface to remove dust. Most LED lights come with adhesive backing. Peel and stick the light firmly. Press for a few seconds to secure. Avoid placing near hinges or moving parts.
Securing Batteries
Open the battery compartment on the LED light. Insert the correct type of batteries as shown by the plus and minus signs. Use fresh batteries for longer light life. Close the compartment tightly to avoid falling out. Check the battery holder is stable and fixed.
Testing The Setup
Turn on the LED light using its switch or motion sensor. Check if the light covers the safe’s interior properly. Look for any dark spots and move the light if needed. Make sure the light stays on without flickering. Replace batteries if light is dim or uneven.
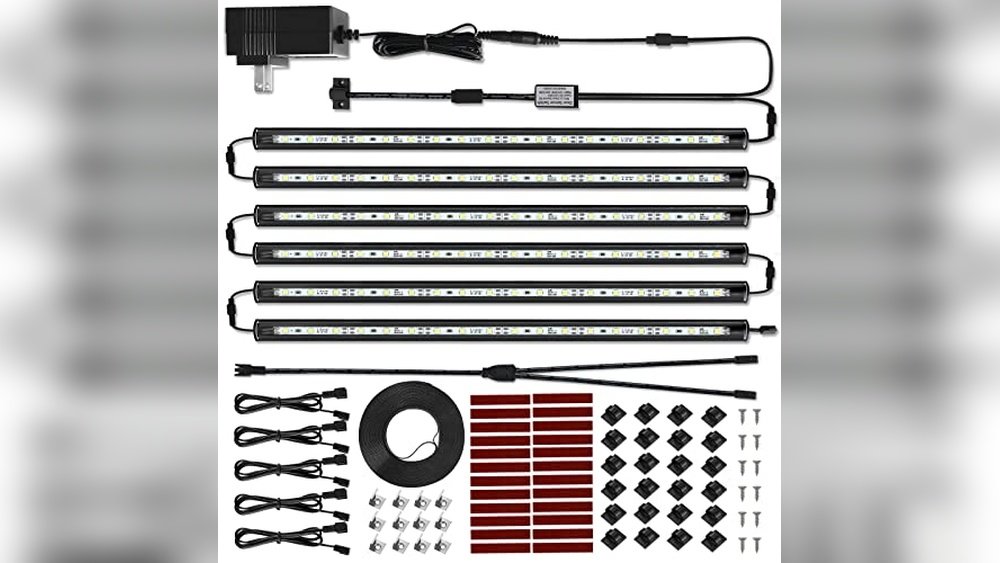
Installing Wired Led Lights
Installing wired LED lights inside a gun safe creates bright, reliable illumination. This setup lasts longer and avoids battery changes. The process takes careful planning and simple tools. Follow clear steps to install the lights safely and neatly.
Planning The Wiring Route
Start by choosing the best path for wires. Look for spots inside the safe that keep wires hidden. Avoid areas that block shelves or door movement. Measure the length of wire needed. Plan to run wires along corners or edges. This keeps the setup clean and organized.
Drilling Holes And Mounting Fixtures
Mark spots for holes carefully before drilling. Use a drill bit that fits the wire size. Drill slowly to avoid damage. Mount LED fixtures on stable surfaces inside the safe. Use screws or adhesive pads based on the fixture type. Ensure lights face the safe’s interior clearly.
Connecting Power Supply
Choose a power source close to the safe. Connect wires from LED lights to the power supply terminals. Match wire colors to avoid mistakes. Use wire connectors or electrical tape for secure joins. Double-check connections before plugging in the power.
Safety Checks
Inspect all wiring for loose ends or exposed metal. Ensure no wires pinch when closing the safe door. Test the lights by turning the power on. Confirm brightness and switch function work well. Unplug and fix any issues before final use.
Adding Motion Sensors Or Switches
Adding motion sensors or switches to your gun safe lighting system makes it more convenient and energy-efficient. These devices turn the LED lights on automatically when you open the safe. They also turn the lights off after you close the door. This feature saves battery life and ensures the lights work only when needed.
Choosing The Sensor Type
Pick a sensor that fits your safe’s size and layout. Infrared motion sensors detect movement inside the safe. Magnetic reed switches activate lights when the door opens. Some models combine both functions. Choose a sensor with a low power draw for longer battery life.
Installation Tips
Install the sensor near the door or inside the safe where it senses movement best. Secure the sensor with strong double-sided tape or screws. Avoid placing sensors where items block their view. Test the sensor before fixing the lights to ensure it works properly.
Adjusting Sensitivity
Set the sensor sensitivity to avoid false triggers. High sensitivity may cause lights to turn on from small movements. Low sensitivity might miss your hand entering the safe. Adjust the setting gradually until the lights activate only when the door opens or you reach inside.
Maintaining Led Lights In Gun Safes
Maintaining LED lights in gun safes keeps them bright and reliable. Proper care helps extend light lifespan and saves money. Regular checks prevent sudden failures and ensure safe visibility.
Regular Cleaning
Dust and dirt can dull LED lights. Clean the lights and safe interior often. Use a soft cloth to wipe surfaces gently. Avoid harsh chemicals that may damage the LEDs. Clean contacts to keep good electrical flow.
Battery Replacement
LED lights need fresh batteries to shine bright. Check batteries every few months for power levels. Replace old or weak batteries promptly. Use the correct battery type for your LED light. Keep spare batteries nearby for quick swaps.
Troubleshooting Common Issues
LED lights sometimes flicker or fail to turn on. Check battery placement and contact points first. Tighten loose wires or connections if needed. Replace bulbs or LED strips if damaged. Reset the light switch or sensor to fix glitches.

Frequently Asked Questions
How Do I Choose The Right Led Lights For A Gun Safe?
Select LED lights that are compact, battery-operated, and low-heat. Choose warm white LEDs for clear visibility. Avoid lights that generate heat or require complex wiring to protect your safe’s contents.
Can I Install Led Lights Without Drilling Holes?
Yes, use adhesive-backed LED strips or battery-powered puck lights. These options don’t require drilling and provide good illumination. Ensure the adhesive is strong enough for long-term use inside your safe.
What Tools Are Needed To Install Led Lights In A Gun Safe?
You typically need a screwdriver, drill (if drilling), double-sided tape, and batteries. A wire stripper may help if wiring is necessary. Proper tools ensure a secure and safe installation.
How Long Do Led Lights Last Inside A Gun Safe?
LED lights can last 25,000 to 50,000 hours. Battery-operated LEDs last longer with efficient power use. Choose high-quality LEDs for durability and minimal maintenance.
Conclusion
Installing LED lights in a gun safe makes it easier to see inside. Choose the right lights and tools before starting. Follow each step carefully to avoid damage. Test the lights to ensure they work well. Bright, energy-saving LEDs improve safety and convenience.
This small upgrade adds great value to your safe. Enjoy better visibility every time you open it. Simple, clear lighting helps protect your firearms better.