If you own rifles, keeping them safe and secure is probably one of your top priorities. Installing an in-wall rifle safe is a smart way to protect your firearms from theft, damage, and unauthorized access.
But how do you get started? You might feel overwhelmed by the idea of cutting into your wall and fitting a heavy safe. Don’t worry—this guide breaks down the process into simple, clear steps you can follow with confidence. By the end, you’ll know exactly how to install your in-wall rifle safe so your guns stay protected and out of sight.
Ready to take control of your gun storage? Let’s dive in.
Choosing The Right Location
Choosing the right location for your in-wall rifle safe is important. A well-chosen spot keeps your firearms safe and easy to access. It also makes installation easier and ensures the safe fits perfectly in your home.
Assessing Wall Structure
First, check the wall where you want to install the safe. Look for studs, pipes, and electrical wires. Use a stud finder to locate the studs. Avoid areas with plumbing or electrical wiring. The wall must be strong enough to hold the safe’s weight. A solid wall with wooden studs works best. Drywall alone may not support the safe securely.
Considering Accessibility And Security
Choose a spot that is easy for you to reach quickly. Think about your daily routines and emergency needs. The safe should be hidden from guests and strangers. Avoid common places like the bedroom closet or main hallway. A discreet location improves security. Balance convenience with secrecy to protect your firearms.
Checking Local Building Codes
Look into local building codes before installation. Some areas have rules about safe installation and wall modifications. Codes may require permits or inspections. Following these rules avoids fines and legal issues. Contact your local building office for clear guidelines. Safe installation must meet all local safety and construction standards.

Gathering Tools And Materials
Gathering the right tools and materials is the first step to install an in-wall rifle safe. Having everything ready makes the job smoother and faster. It also helps avoid mistakes that could damage your walls or the safe. Preparation ensures safety and accuracy during installation.
Essential Tools Checklist
Start with a basic set of tools. You will need a drill with bits for wood and masonry. A stud finder helps locate the best place to install the safe. A level ensures the safe fits straight. Measuring tape is necessary for precise cuts. A pencil or marker is needed to mark the wall. A saw, preferably a drywall saw or reciprocating saw, is required to cut the wall. Finally, screwdrivers and a wrench set help secure the safe in place.
Selecting The In-wall Safe
Choose a safe that fits the space available. Measure the wall thickness and height before buying. Look for a safe with strong steel construction. Check the lock type and ease of use. Some safes come with fireproof or waterproof features. Pick one that meets your security needs and fits your budget.
Safety Gear Preparation
Protect yourself during installation. Wear safety goggles to shield your eyes from dust and debris. Use work gloves to prevent cuts and scrapes. A dust mask helps you avoid breathing in drywall dust. Consider ear protection if you use loud power tools. Proper safety gear keeps you safe and comfortable throughout the process.
Preparing The Wall
Preparing the wall is a key step before installing an in-wall rifle safe. This process ensures the safe fits securely and stays hidden. Proper preparation helps avoid damage and keeps the installation neat.
Measuring And Marking The Spot
Start by choosing the right location on the wall. Use a tape measure to find the exact height and width needed for the safe. Mark the outline clearly with a pencil. Double-check the measurements to avoid mistakes.
Cutting The Drywall
Wear safety goggles before cutting. Use a drywall saw to cut along the marked lines carefully. Cut slowly to prevent cracking or breaking the surrounding wall. Remove the drywall piece gently to expose the wall cavity.
Clearing Wall Cavity
Look inside the wall cavity for any obstacles like pipes or wires. Move insulation aside carefully. Clear out any debris or nails that could block the safe. Make sure the cavity is clean and ready to hold the safe securely.
Installing The Safe
Installing an in-wall rifle safe requires careful steps to ensure security and stability. This part of the process focuses on placing the safe correctly and fixing it firmly inside the wall. Proper installation keeps your firearms safe and easy to access.
Fitting The Safe Into The Wall
Start by measuring the wall cavity where the safe will go. The safe must fit snugly without forcing it. Gently slide the safe into the opening. Check if the back of the safe touches the wall studs. This contact adds extra support. Adjust the position slightly for a perfect fit.
Securing The Safe Frame
Use strong screws to anchor the safe frame to the wall studs. Drill pilot holes first to prevent wood splitting. Tighten screws evenly on all sides. This holds the safe firmly against the wall. Secure the frame from inside the safe to keep screws hidden. A stable frame stops the safe from moving or falling.
Ensuring Level And Alignment
Place a level on top of the safe to check alignment. Adjust the safe until it is perfectly horizontal. Use shims if needed to fix any tilt. Check the safe door opens smoothly without obstruction. Proper leveling ensures the locking mechanism works correctly. Double-check alignment before finishing the wall around the safe.
Finishing Touches
Finishing touches are key to complete your in-wall rifle safe installation. This step ensures the safe blends well with your wall and functions properly. Proper finishing also keeps the installation secure and neat.
Restoring Wall Surface
Begin by fixing the wall around the safe. Use drywall patches to cover gaps or holes. Sand the area smooth once the patches dry. Paint or wallpaper over the repair to match the rest of the wall. This restores the wall’s look and hides the installation.
Camouflaging The Safe Door
Make the safe door blend with your wall. Use paint that matches your wall color. You may also add a decorative panel or frame around the door. This step keeps the safe discreet and less noticeable. Concealment adds an extra layer of security.
Testing Door Functionality
Check the safe door for smooth operation. Open and close it several times to ensure no sticking. Test the locking mechanism to confirm it works well. Adjust hinges or locks if necessary. A fully functional door keeps your firearms safe and secure.
Maintaining Your In-wall Safe
Maintaining your in-wall rifle safe is key to keeping your firearms secure and safe. Regular care ensures the safe works smoothly and lasts longer. Simple steps can protect your investment and give you peace of mind.
Regular Inspection Tips
Check your safe’s lock and door often. Look for signs of rust, damage, or wear. Make sure the door closes tightly and locks properly. Test the lock mechanism to confirm it works without problems. Inspect the mounting to ensure the safe stays firmly fixed in the wall.
Cleaning And Lubrication
Keep your safe clean by wiping it with a dry cloth. Avoid using water or harsh chemicals that may damage the finish. Use a light lubricant on the lock and hinges to prevent sticking. Apply lubricant sparingly to avoid attracting dust. Clean the interior to prevent dust buildup that can harm your firearms.
Updating Security Features
Check if your safe’s lock system has newer, better options. Consider upgrading to electronic or biometric locks for improved security. Replace old batteries in electronic locks regularly. Add extra security measures like alarms or reinforced mounting brackets. Stay informed about new safety tools to keep your firearms protected.
Frequently Asked Questions
What Tools Are Needed To Install An In-wall Rifle Safe?
You need a stud finder, drill, level, screwdriver, drywall saw, and measuring tape. These tools ensure precise cutting and secure mounting of the safe.
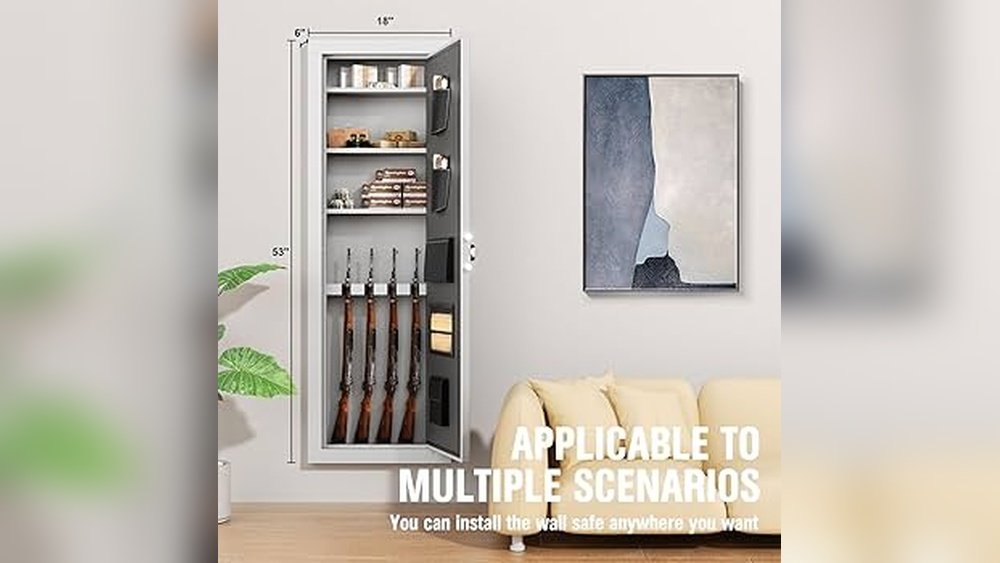
How Deep Should The Wall Be For An In-wall Rifle Safe?
The wall cavity must be at least 6 to 8 inches deep. This depth accommodates most in-wall rifle safes securely.
Can I Install An In-wall Safe Without Professional Help?
Yes, if you have basic DIY skills and follow instructions carefully. However, professional help ensures proper installation and safety.
How Do I Choose The Best Location For The Safe?
Select a discreet, accessible spot away from moisture and direct sunlight. Consider ease of access and security when choosing placement.
Conclusion
Installing an in-wall rifle safe keeps your firearms secure and hidden. Choose a good spot and measure carefully. Follow the steps to cut, fit, and mount the safe. Use the right tools and take your time. This helps protect your guns from theft or accidents.
A well-installed safe adds peace of mind to your home. Stay safe, stay prepared.